Shrink pots are another item I have been making.
These pots have been made with silver birch, felled about November. But I understand you can use most green woods, but you do need to think about how and what they are going to be used for. Traditionally they were used to store dry goods possibly even flour, you could even seal the base with some bees wax and use them as a cup. After letting them dry out you can then make a lid. Most of mine have gone into school to be use
The Process and tips.
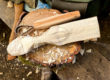
The Base
I would start with the base, find a dry flat piece of wood large enough for the base of your pot about 10mm (3/8”) thick, thinner is ok. I have cheated here in that I have split ash previously that was too dry to whittle and then used an electric plane to thin them down, these I have then kept inside ( don’t tell anyone. if you do this, a tip for planing is to put some wooden pegs into a board to help hold the piece of wood in place while planing). Some people prepare a piece of green wood first and let it dry while they do the pot.
The Pot.
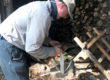
You need a nice green reasonably fresh log.
Chain drill from both ends if your drill bit, or auger bit is short.
Then use a narrow chisel to link these holes, as you can also twist the chisels/gouge which will tear the fibres, then remove the core.

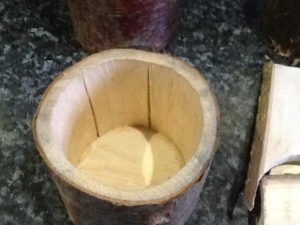
Now you need to thin the wall to about 1cm.
Depending on what tools you have will help you decide how you will do this. I use an in-channel gouge and a spoon crook knife (a shallow curve spoon knife, I think would be better than what I have at present). Try and get the wall an even thickness.
Next decide which end is the bottom. Square the pot off so it stands how you would like it, then about 1cm from the bottom you need to cut a channel for the base to fit in. This is the tricky job, I have modified a mortise gauge but you can mark two lines about 3mm apart with a gauge of some sort, then using your knife, flex cut multi tool jack knife or cranked v cutter to make a channel between these lines.

Once you have done the channel for the base, put a chamfer on the inside bottom edge to aid fitting the base.
Now place the bottom of your pot on the dry flat piece of wood you prepared earlier, scribe around the inside of the pot and put an alignment mark on the base and the pot. Cut out close to this line.

Tip: The larger the pot the looser the base should fit.
On 50mm(2”) pot, I have got away with a tight fit.
My last pot 3-1/2”diameter, I made the base and it just fell through. After the first day I put a clamp on it to keep the base in place. After another two days, I removed clamp and pressed around the base to get it to seat down, I could still see light through some cracks around the edge, but another two days and its perfect.
Back to the base.

Place the piece of wood you have cut out on a flat surface with a pencil lying beside it, now rotate the base scribing with the pencil, then turn it over and repeat. this will give you a centre line to work with. Now chamfer the inside edge of your base quite steeply and the outer edge gently until you have about 2-3mm on your centre line. Keep putting the pot over the base to check on its fit.
If it’s too tight the pot will crack, once fitted you will not been able to remove the base without damaging the pot, so keep checking on the shape and fit, its worth a little more time on the shape and fit of the base.
Fit your base
You don’t have to leave the bark on, you can remove the bark and carve patterns, I just like silver birch bark.
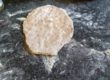
I don’t always get it right, this is a picture of one of my cracked pot after two weeks, because I made the base a little too large.
Have fun making pots for your pens/pencils, bits and pieces or a container for all those whittled spoons and spatulas, let your imagination go.