Making cordage from natural materials is a fundamental bushcraft skill; attend any basic bushcraft course and the chances are you’ll learn how to turn such as nettles or willow bark into lengths of string.
However having learnt this new skill you’re faced with the question of what use it can be put to other than making cordage to tie objects together. Having an interest in the primitive skills side of bushcraft I thought I’d make something practical – a tumpline.
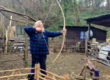
So what is a tumpline? The other term for a tumpline is a burden strap which more obviously describes its function. Basically it’s a long band of some strong material which goes around the body, either across the forehead or across the shoulders and the top of your chest, holding the weight of a load close to the body while leaving the hands free.
Although this project might seem daunting it actually doesn’t require a lot of skill other than being able to make tight cordage that is fairly consistent in diameter and number of twists per unit length. Other than that it just requires perseverance and patience. An added bonus is that it does hone your cordage making skills – I grew considerably quicker in my cordage making as the project went on.
The tumpline I made was a shade over nine feet long when finished which meant it could easily go around both me and whatever I wished to carry with plenty of extra strap to allow for tying off. I wouldn’t recommend making it any shorter though of course you could just make a belt.
The strap needs to be wide enough to stop it cutting into your body when you’re carrying a heavy load so an inch in width would be about the minimum. Mine worked out to just under one and a half inches.
The material used for making the tumpline was the retted inner bark of the lime tree since I knew it would be strong enough to support any load I would be willing to carry.
First I hand rolled five 19 feet lengths of tight rolled cordage. These had to all be between three and four millimetres in diameter and have the same number of twists per inch.

Stage 1
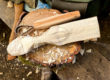
These were then folded in half to make ten warp cords leaving a small loop in the top (within which I had a bone ring though that wasn’t a necessary part of the process). These warp cords were laid flat next to each other and a thinner length of cordage (the weft) was passed through each ply of the warp cord then cinched tight to hold the strap together.

In the first picture below I’ve used green garden string to make the process more obvious. The second picture shows the work in progress – as you can see I used an antler needle to thread my weft cords.


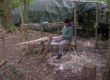
The growing tumpline and the cords waiting to be part of it need to be held under some tension. The method I used was to hang a weight off each cord. The weights used don’t have to be anything fancy; one time I used bags of kitten food.
It’s important to make sure you thread through all the warp cords in the same order each time and using individual weights on each cord makes this process somewhat easier.

When you get near to the end of each warp cord you should thread in a fresh one so that you overlap the old and new warp cords for two or three rows of weaving. The simplest way of doing this is to put both the old and new weft cords in the needle at the same time – it’s best to have the old weft the nearer the blunt end of the needle.


When you get down to the last six inches or so of the tumpline it’s traditional to split it into two parts for decoration. It also had the advantage of meaning I only had to deal with five warp cords at a time. Since they were no longer held in their proper order by any weight on them they did have a tendency to get out of order. I wove down to the end and then back to strengthen the ends and wrapped them in nettle cordage to help prevent them fraying.
The final task was to cut and burn off any stray fibres to neaten things up.
So after making about 140 feet of cordage and spending about 35 hours I was finished.

© Stephen Taylor 2006